Setting up a common resource across different environments is always a redundant task, It not only incurs cost , it also takes time to test and validate the same , one such use case we see with is setting up a License server with every new environment ( prod1, prod2 etc ) , This redundant server setup problem can be solved , if the license server can be deployed as a shared resource and consumed from different environments deployed in different VPC’s.
There are different solutions to solve the problem, AWS private link is one solution for the same, it helps in setting up a shared resource in one VPC and provide access to the client / environment configured in another VPC without compromising on security and not exposing the traffic over internet.
More Info – AWS private Link – https://aws.amazon.com/privatelink/
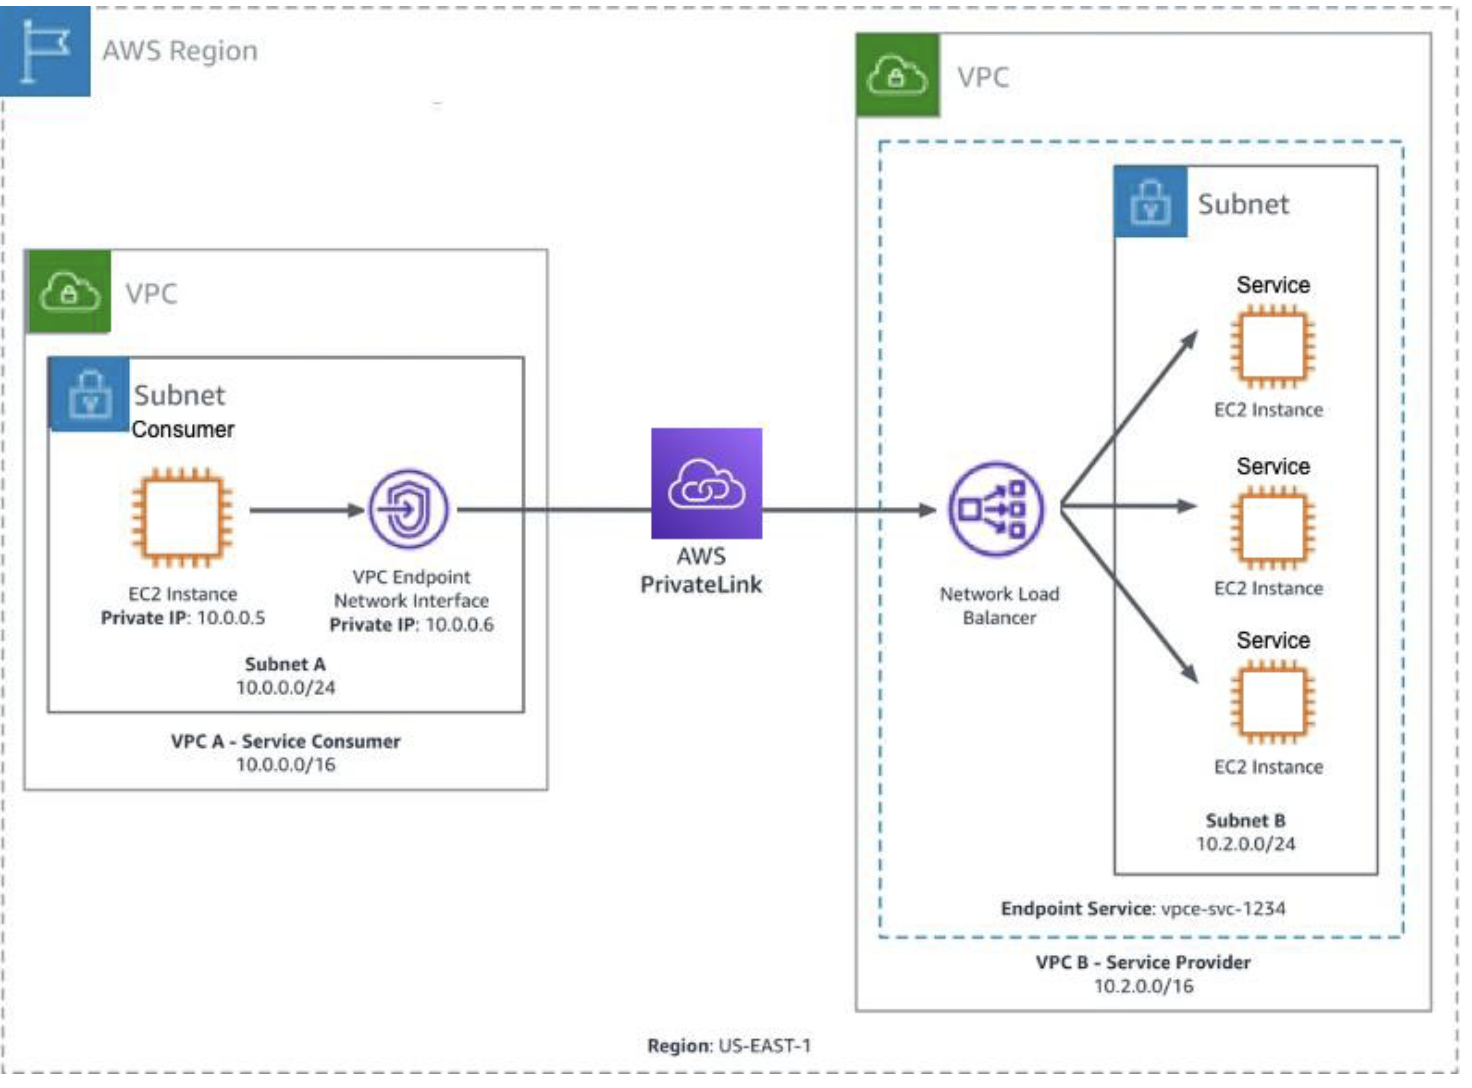
AWS private link can be configured using the following two VPC resources.
1) Endpoint Service ( Producer side , used for exposing the shared resource via a Network load balancer- NLB )
2) Endpoint (Consumer side, used for consuming the shared resource exposed using Endpoint service via a Elastic Network interface – ENI )
Endpoint service and Endpoint can be configured in different VPC’s within the same region Let’s see how an Endpoint Service and an Endpoint can be configured
Endpoint service (Producer side)
1) Endpoint service configuration can be done in any shared environment which can be consumed by different clients / environments.
2) Network Load Balancer ( NLB ) is a prerequisite for creating endpoint service and need to be configured with Endpoint service.
3) NLB can configured to the target where the shared resource is deployed.
4) In the current License server setup, license server is installed on EC2 as NLB target.
Endpoint Service Creation :
1) Go to VPC console, Select Endpoint Service from the left panel
2) select Endpoint and provide the required configuration.
Endpoint ( Consumer side )
Endpoint configurations need to be done on the consumer side for consuming the shared resource.
Endpoint requires the name of Endpoint Service.
Elastic Network Interface ( ENI ) is created and attached to Endpoint once the endpoint is created.
Private IP address of the ENI acts as interface for accessing the shared resource exposed through Endpoint service.
Endpoint Creation :
1) Go to VPC console , Select End point from the left panel as follows
2) Select Endpoint and provide the required configuration as follows
2.1) select other endpoint service and give the name of the service ( this is name of the endpoint service , Eg: com.amazonaws.vpce.us-east-1.vpce-svc-XXXXXX) to be consumed.
2.2) Click submit once the endpoint service name is given , once done with submit an Endpoint ( Interface Type ) is created along with a Network Interface as shown below.
2.3) Once Endpoint is created , it will not be ready to use, it requires an additional step of approving respective endpoint from endpoint service console. After End point is approved from End point service , the status of Endpoint is shown as Available , until then we will see the status as Pending for approval Once the end point status is Available , end point is ready to be consumed using the private IP address of the Network interface created along with the End point.
** Private IP address of network interface used for consuming the shared endpoint service.
Linking Endpoint to Endpoint service –
1) Once Endpoint Service and Endpoint is configured, next step is to link Endpoint to Endpoint service for consuming the shared resource hosted on Endpoint Service.
2) For approving Endpoint from Endpoint service, go to Endpoint Service -→ Endpoints tab , select the respective endpoint and click on action and approve the End point.
3) Once done , endpoint is ready to be consumed using the private IP address of the elastic network interface ( ENI ).
Accessing Shared resource –
Once Endpoint Service and Endpoint are configured , clients can access the shared service hosted with Endpoint service using Elastic Network Interface ( ENI ) private IP address created with Endpoint.
Accessing Centralized License Server:
our App makes use of Docker plugin for accessing the Licensed server.
docker plugin discovers the Licensed server using predefined IP , therefore following additional steps are required for accessing the centralized license server.
Launch a t3.nano machine which acts as a proxy machine to connect to Endpoint.
Have a predefined IP – xxxx for the proxy machine , This is a predefined IP configured for plugin for discovering the licensed server.
To access the centralized license server from the proxy machine, Tunnel is configured between Proxy machine and ENI as follows
The Linux utility simpleproxy can be used to setup the proxy, once the utility is installed you can use the following command to setup the proxy.
Eg : simpleproxy -L portno -R x.x.x.x:portno
x.x.x.x is the IP address of the Network interface which will be pointing to the centralized server configured using AWS private link.
portno is port on which license server is listening for the incoming license requests.
Tunnel is setup as a service on the proxy machine using the following steps to make sure it’s up and running even after system restarts.
install simpleproxy utility , more info on the untility : https://manpages.ubuntu.com/manpages/kinetic/en/man1/simpleproxy.1.html
usage of simpleproxy command
simpleproxy -L [local port on which you want to listen for remote requests] -R [remote host:remote port for which you want to proxy/tunnel to]
once simple proxy is installed , create a file named simpleproxy.sh in /tmp and add the following content.
simpleproxy -L 22350 -R 10.0.26.109:22350
Go to the directory : cd /etc/systemd/system
Create a file named xxx-service.service and include the following
[Unit]
Description=xxx service
[Service]
User=root
WorkingDirectory=/tmp
ExecStart=/tmp/simpleproxy.sh
Restart=always
[Install]
WantedBy=multi-user.target
save the above file and then start the service using the following command.
systemctl start xxx-service.service
Once complete above configuration is in place , we are good to validate the centralized license server.
